 |
|
|
|
|
|
|
|
|
|
|
|
|
|
|
|
|
|
|
|
|
|
|
|
|
|
|
 |
|
|
|
|
|
|
|
|
|
|
|
|
|
|
|
|
|
|
|
|
|
The King is a special piece on the board in that it has no assigned value. It is a piece that is to be guarded by all other pieces or else the game will end in "Checkmate" which means "The King is dead!" The King spends most of the game hiding until few enemy pieces are left to attack it. Then in the "endgame," it marches to the center of the board to become a powerful fighting piece.
Moving
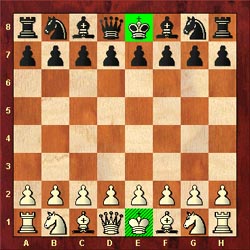
The King can move to any open adjacent square not under attack by an enemy piece (Diagram #1). Moving to a square attacked by an enemy piece is putting a King into danger, or "check." In Diagram #2, the white King cannot move to the f5-square or d4-square because it would be putting itself into danger. This is illegal. However the King can safely move to the d6-square.
Capturing
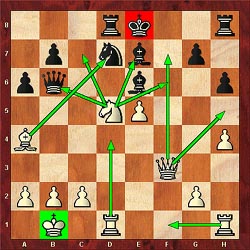
First rule… both Kings must remain on the board the entire game. The King cannot be captured and is only able to capture a piece that is not "protected" by another. For example, the position in Diagram #2 shows the white King with many enemy pieces surrounding it.
Which of the black pieces can the white King capture?
Answer: It is possible for the King to only capture the Rook on the f6-square and the Knight on the d4-square. Why? Because these pieces are not protected and capturing them would not put the King into danger or check. However, the King cannot capture the Pawn on e6 (protected by the Rook Bishop, and both Knights ), the Bishop on d5 protected by the pawn and the Knight on f4), nor the Knight on f4 (protected by the Rook). Capturing any of these pieces is illegal.
|
|
|
|
|
|
|
|
|
|
|
|
|
|
|
|
|
|
|
|
|
|
Diagram #1: King movement
|
|
|
|
|
|
|
|
|
|
Diagram #2: King captures
|
|
|
|
|
|
|
|
|
|
|
|
|
|
Best positioning of King
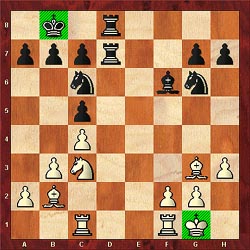
The best position for the King primarily depends on the positioning of the Pawns. The Pawns are the bodyguards for the King and shelter it from attack of the other pieces. Usually the King would like to stay away from open files, ranks and diagonals or where there is an absence of his pawns. Thus, in the beginning of the game, the King is best positioned off to the side of the board as in Diagram #3. This is often accomplished by a move called "castling." More on this later.
The center of the board is dangerous for a King because this is where the board opens up very quickly. It is like the middle of the battlefield where missiles are being fired… the King must stay out of the way. In Diagram #4, we see the black King got stuck in the center and is tremendous danger without any pawns to protect him. At the same time, we see that White's King is tucked away neatly. White won the game in brutal fashion sacrificing his Queen and checkmating his famous Grandmaster opponent.
|
|
|
|
|
|
|
|
|
|
|
|
|
|
|
|
|
|
|
|
Diagram #4: King in danger
|
|
|
|
|
|
|
|
|
|
|
|
|
|
|
|
|
|
|
|
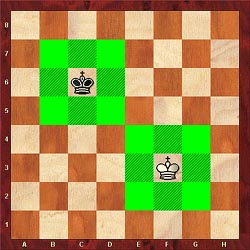
The Endgame
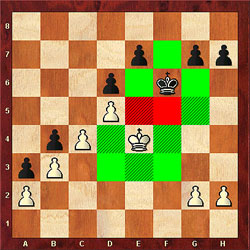
When most of the battles have been fought (in the opening and middlegame), and most of the pieces have been captured, the King begins to move out into the center of the board. From this position, the King often opposes the other King and engages in close-range combat (one square away). In Diagram #5, we see the two Kings fighting for position and neither King can move into the "red zone."
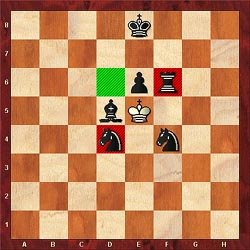
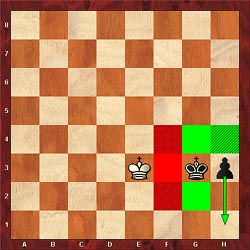
It is often the King that assists in helping to usher Pawns to the enemy's end zone for a promotion. In Diagram #6, you see how the King prevents the enemy King from attacking the pawn which is headed for promotion (when reaching the opponents first rank, the Pawn can become a Rook, Bishop, Knight or Queen). Once one side gets a winning advantage, then it is often the King that helps to corner and checkmate the enemy King. More on this later.
|
|
|
|
|
|
|
|
|
|
|
|
|
|
|
|
|
|
|
|
Diagram #5: Fighting Kings
|
|
|
|
|
|
|
|
|
|
Diagram #6: King as a blocker
|
|
|
|
|
|
|
|
|
|
|