
George Floyd and the Right to Thrive
The United States of America that you once knew, has been changed forever. That America has fallen.
Many of you have stayed close to home due to the global pandemic that we are facing. You have no doubt seen the outpouring of anger in the aftermath of the George Floyd’s May 25th murder at the hands of the Minneapolis Police Department here in the U.S. Floyd was accused of passing a counterfeit 20-dollar bill.
America lies in ruin with more than 107,000 dead from the dangerous coronavirus, 40 million having filed for unemployment, and more than 30 cities in turmoil. Before the end of this article, you may also have a better idea of why Black chess players do not have a strong presence in American tournaments.

The American economy is in shambles, and there is no sense of direction. If you are viewing these events from outside of the U.S., you may be shocked to see the turmoil. Maybe you saw it coming. Many countries around the world are dealing with the “minority” question. It is an inescapable dilemma that countries (especially America) have had to deal with for centuries.
I write this expression as one of the few chess websites that may feel an urgency to address this issue. I am a Black male, born and raised in the U.S., and have witnessed and experienced the societal discord the world is now seeing. Here in the U.S., we are dealing with a plethora of political, economic, social, and legal issues. Thousands are dying. People are angry. Cities are burning.
The Spark in a Powder Keg
The tragedies that have unfolded in the past week have produced a violent reaction to the recent death of George Floyd of Minneapolis, Minnesota. Officer Derek Chauvin was arrested on 3rd-degree murder charges after kneeling on Floyd’s neck and back for eight minutes with both knees. Two other officers knelt on Floyd’s legs while yet another watched.
While a preliminary autopsy by the Hennepin County was vague, the official account listed “cardiopulmonary arrest complicating law enforcement subdual, restraint and neck compression” as the cause of death (link). An independent autopsy found abrasions to the left side of the face and ruled that “mechanical asphyxiation” had occurred.
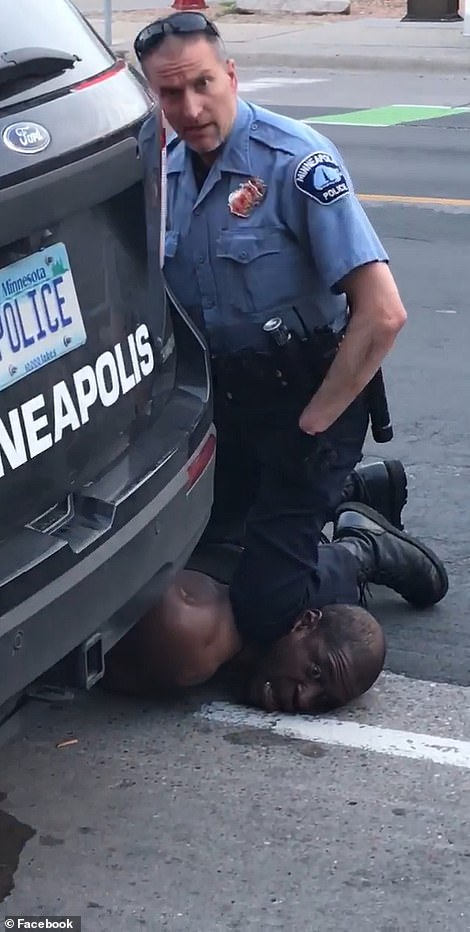
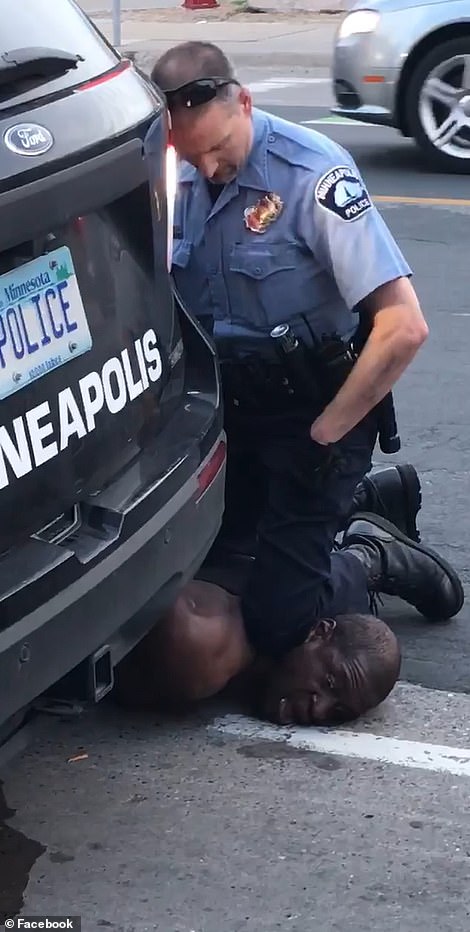
Officer Derek Chauvin casually applying deadly force
on the neck and back of George Floyd.
Floyd (nose bleeding), plead for his life, said in desperation, “I can’t breathe!” “Don’t kill me.” “I can’t breathe!” Squirming to relieve the pressure on his neck, Office Chauvin repositioned his frame to exert more downward pressure. According to the police report, police applied pressure for 5 minutes and 53 seconds, after which Floyd lost consciousness. Chauvin had his knee in Floyd’s neck for almost three additional minutes (8:46 total). Floyd was later declared dead.
While is not clear how and where Floyd got the currency note, he effectively died over $20. Protests have broken out all across America, expressing outrage at the egregious violations of authority by the police. There is a long history of this treatment to Black men who are frequent targets of discrimination, disproportionate force, and unequal justice. These are stark realities. These words may be painful to read, but I am asking that you not ignore this issue.
For those outside of the Black community, it may be hard to understand the depths of frustration spilling onto American streets. I have had conversations with high-level chess players who downplayed the social dysfunction and ill treatment of Blacks. A tradition of discrimination has occurred nonstop for more than 400 years. NONSTOP. Through sheer strength and determination, a percentage of us in the Black community excel in various fields despite the conditions we face. Unfortunately, social inequities (based on one’s African ethnicity) are still present worldwide.
America and its Social Contract
When I traveled to Egypt decades ago, I met a young Haitian man named Jean Renoir Eugene. He was a brilliant, energetic student at West Virginia Wesleyan College. I had just finished my stint in the computer industry and was set to attend graduate school. We immediately developed a friendship, and enjoyed lengthy conversations well into the night overlooking the Nile River.
Jean shared many pearls of wisdom, but I was most impressed by how well-read he was. After the group tour was over, we communicated (via letter and phone) for a few years, reminiscing and sharing our dreams. At some point, we lost contact, and I never saw him again. I later discovered that he died years later as a young physician in Atlanta, where I did my graduate studies.

Jean mentioned Jean-Jacques Rousseau’s classic, The Social Contract, a book written in 1762 on establishing sustainable political reforms. When he cited this book in our discussions, I was unfamiliar. While this remarkable book was written 258 years ago (before the U.S. Declaration of Independence), it has been debated, criticized, and interpreted in many ways. While America’s situation is different from 18th century Europe, the country is in need of a new social contract.
Like most countries, the U.S. Constitution is set up with a body of laws that pledge to protect the citizens, grow the economy, and distribute its resources. When the constitution became effective in 1789, a segment of white men wielded absolute power. For the entire 20th century, America grappled with what to do with the freed slaves and their descendents. The result was a system fraught with all types of social, political, economic, and legal inequities. Hence, the U.S. could not claim to be a “true democracy” until civil rights were afforded to all by law in the 1960s. There have been 27 amendments since 1789, but the injustices have persisted despite constant protestation. It’s time for a totally different approach.
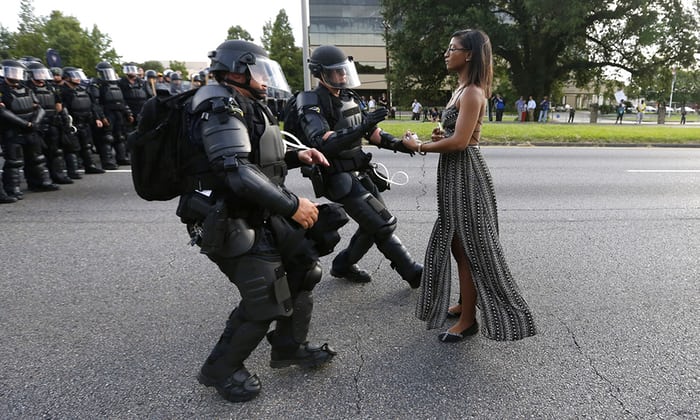
Ieshia Evans faces armored police July 9th, 2016 in Baton Rouge, Louisiana, during the protest of the police shooting deaths of Philando Castile and Alton Sterling. Photo Jonathan Bachman.
Never Forget #sagethepolice pic.twitter.com/Ba4Uoyfzqu
— WALASIA aka Khulan Khan ??? ??? ? (@WALASIA) March 7, 2016
A woman burning sage to detoxify and dispel
the environment of negative energy.
In the first 20 years of the new century, many of these same violations of the constitution persist. Many Black men have to be concerned about being pulled over by the police authorities and making all the right moves to avoid being shot even if we do everything we are asked. In the instance of Black men being shot murdered by police (i.e., Amadou Diallo), officers are seldom punished, and we move on after a few months of protest.
Few outside of the Black community can imagine the amount of stress hormones that build daily. This leads to a weakened immune system and all types of chronic issues. We have seen countless instances of injustices, and each observation makes one more wary. Each and every day, we may meet someone who will try to force their will on us in the most bizarre ways. Recently a woman named Amy Cooper called the police on Christian Cooper, a Black man who only asked that she leash her dog in a bird park.
Ms. Cooper was more offended by a Black man correcting her than she felt threatened. She called the police to make the situation appear as dangerous, screaming that “an African-American man was threatening her.” With her fake tears and amateurish theatrics, she exploited the poor relationship between the Black community and the police. She anticipated punishment for Mr. Cooper. It is a dangerous game.
Ms. Cooper perpetuated a stereotype of the Black male being the aggressor, even when he was being victimized! We remember the demonizing of Trayvon Martin after his death. Granted, the situation is very complicated, but the (in)justice system will need to be torn down and rebuilt. The world is watching. They were watching in 1968. They were watching in 1992. They are watching now.
The Anatomy of Despair
Floyd’s brutal murder was the latest in a string of egregious violations of human rights affecting Black people in America. The centuries of slavery, another century of lynching and discrimination, and two decades of police abuse (captured on cell phones) present a compelling case.
It will cause those outside of the U.S. to wonder why this is still happening. In America, there has been a change in the demographics. Long gone is the America of 60-70 years ago. Frankly, it scares those who may feel a threat to their entitlement to power and authority. However, that America has fallen.
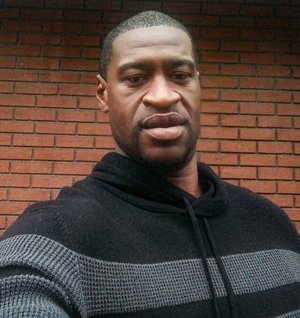
George Floyd
Over the years, there have been many protests and activist movements. We have seen this story play out before. It goes like this. After the incident, we see a wave of angry people in the streets protesting the death. Protest and human rights leaders shout, “No Justice! No Peace!” Arrests are made of the offending police officers. Then the magic happens.
The crowds go home, we clean up the glass and rebuild the structures. We then ponder the authorities’ solutions, which may include commissions set up to study police training and protocol. We listen to the trials. The verdict comes in, and justice often doesn’t fit the crime. No substantive changes are ever made in policing, we mourn again, and we are left to wait for the next tragedy to happen. This has been a 400-year pattern of American history. How does one concentrate on anything when facing such a climate?
Peace of Mind
If you look objectively at today’s situation in America, you may understand why it is difficult to have peace of mind as a Black person. The hostile environment puts us at a disadvantage in education, business, health, and social wellness. It is with a sense of irony that I am often asked why there are not more Black chess players competing. As I stated in my 2010 essay, “The Challenge of the Black Chess Master,”
…Blacks tend to face greater financial hardship (on average) for a multitude of socioeconomic and historical reasons. Thus, the opportunity costs for focusing on chess remain exceedingly high. Since the payoff is usually not commensurate with investment of time and money, the focus on chess becomes an afterthought. Many promising players have left the game for better economic opportunities and have relegated chess as a weekend hobby, or have quit altogether.
Right-wing Stormfront/Vanguard racists trolled my essay spewing nonsense about Black inferiority as the cause for a relatively small number of Grandmaster-level Black players. They offered questionable data and offered that everyone has the same socioeconomic obstacles. They then demeaned the story of Uganda’s Phiona Mutesi who grew up in abject poverty. Fortunately, their demoralizing tactics were refuted.

While we were in Aswan (Upper Egypt), my friend,
the late Dr. Jean Renoir Eugene shared some sage knowledge!
Apart from economic disparities, there are social pressures and safety concerns that occupy our minds. Peace of mind is something we all covet. Peace of mind is what George Floyd sought when he left Texas for Minnesota. Peace of mind is desired for happiness… desired for mental stability… desired for one to thrive. Peace of mind is also necessary to be able to focus on a game of chess. Frankly, peace of mind is something we have never had in America.
Know Justice. Know Peace.
Thank you for writing this Daaim.
Adia,
I’m hoping your are safe up there. If you decide to go out, please err on the side of caution. We need you.
Video by Nick Cannon
Thanks for sharing. I am a historian as well as a chess player. My history teaching has veered from where it started in the late-20th century, so I follow the events you describe here less closely than I once did (although I’ve seen all of them in my several news feeds).
Your historical analysis strikes me as on the mark, except for the first sentence. The US that I once knew (the one you refer to) was always an illusion, and I stopped knowing it in graduate school in the late 1980s. In fact, paying close attention to the Reagan years while they were happening removed my sense of America from the illusions of my childhood and sent me back to school. What has changed, in mo opinion, is that the truth is becoming harder to conceal.
If you have not seen it, take the time to watch James Baldwin’s talk to teachers at Berkeley in 1979. It is on YouTube. As a “white” man, I find his words a little harsh, but I cannot refute his claims.
Brilliant article Daaim. This is very upsetting. What should be done though? Yes, demonstrating is the right way to go and our family over there in the belly of the beast has all our support. It is time to have a serious think though. As you mentioned, it will calm down and the situation will go back to normal whilst the racists bide their time and prepare for the next victim to assault and kill.The answer must come from the our collective melanin community.I suspect that economic planning may be an important step in the process. Support black banks and businesses.Think about the education our kids are getting and change counterproductive content . Somehow prioritize self advancement.We need to adapt to these challenges or face extinction.We have unfortunately been completely infiltrated by people who don’t have our interests at heart.The silence from so-called African leaders here on the continent is deafening. It is not surprising though as they are puppets who think with their stomachs.Our leaders here are just warm bodies who cannot do anything to advance our plight as they are safely in ‘masters’ pockets. When are we going to change our tune from a change is gonna come to we will change the status quo for the benefit of our children.Steve Biko wrote: Blackman,you are on your own.It shall forever be that way till we realize that umuntu ngumuntu ngabantu(You are,therefore Iam!).