 |
|
|
|
|
|
|
|
|
|
|
|
|
|
|
|
|
|
|
|
|
|
|
 |
|
|
|
|
|
|
|
|
|
|
|
|
|
|
|
|
|
|
|
|
|
These are two words we often love to say, but hate to hear announced against us. Most everyone, including non-chessplayers know the words "check" and "checkmate." Many news stories you read often use chess metaphors to describe some unfolding event and sometimes will say someone has been checkmated.
Check!
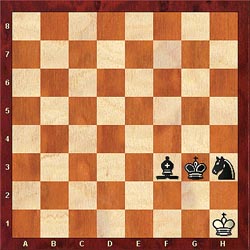
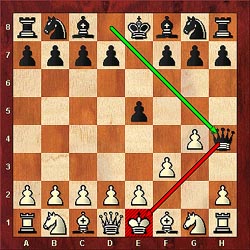
The word "check" is merely saying, "King is in danger" and it demands immediate attention. In Diagram #1, the black King has been put in check by the white Bishop. When a King is in check, there are three options: Black can (1) capture the checking piece (2) block the line of fire, or (3) move the King from the line of fire.
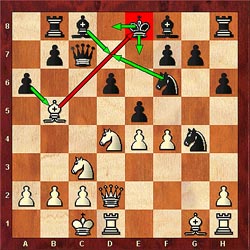
In Diagram #1, black can use all three of these options (noted by green arrows) to remove the King from danger. There are some special cases. When in check by a Knight, there is no blocking option. Another situation that often has a deadly effect is the "double check." In Diagram #2, black must move his King because there is no way to capture the two checking pieces or block both checks in one move. All double checks must be met by a King move.
|
|
|
|
|
|
|
|
|
|
|
|
|
|
|
|
|
|
|
|
Diagram #1: Black is in "Check"
|
|
|
|
|
|
|
|
|
|
Diagram #2: "double check"
|
|
|
|
|
|
|
|
|
|
|
|
|
Checkmate!
If it is not possible to get the King out of check with one of the three above options, then it is called "checkmate," or simply "mate." In Diagram #3 and #4, we see examples of checkmate. Checkmate can be directly delivered by any piece on the board except for the opposing King. Checkmates are rare in games between advanced players because many players respectfully resign before forcing the opponent to play until the King is checkmated. In games featuring one or two beginners, more errors are made, so many of these games end in checkmates.
Following are some rudimentary checkmates against the lone King. The first two of these four mating methods are the easiest to learn. The last two require a bit more patience and understanding.
King vs. King and Queen
King vs. King and Rook (see Diagram #3)
King vs. King and two Bishops
King vs. King, Bishop and Knight (see diagram at the top of the page)
|
|
|
|
|
|
|
|
|
|
|
|
|
There are many other scenarios, but learning these four are essential! Of course checkmate can occur very early in a game with all of the pieces still on the board. The quickest checkmate is known as the two-move "Fool's Mate" and it demonstrates the danger of exposing the king. This position is shown in Diagram #4. At this stage in your development, you should only move the pawns on the d-file or e-file two squares for your first move. Then develop your pieces as instructed in the previous lessons.
|
|
|
|
|
|
|
|
|
|
|
|
|
|
|
|
|
|
|
|
|
|
Diagram #4 The Fool's Mate
|
|
|
|
|
|
|
|
|
|
|
|
|
Stalemate
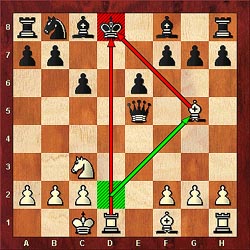
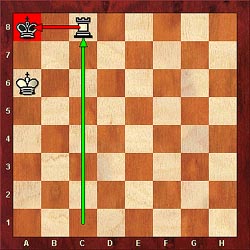
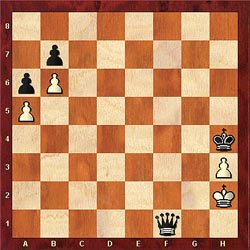
As opposed to checkmate, there is also the rule of "stalemate" which is a game ending in a draw. This rule can be confusing and some advanced players still wonder why it does not count as a win. A stalemate occurs when the losing side cannot avoid exposing their King to check, but they are not yet in check! In addition, no other piece can make a legal move. Diagram #5 provides an example. Black has just promoted his f-pawn to a Queen, but now the white King can make no legal move without exposing himself to check. The game is a stalemate and the game is declared a draw.
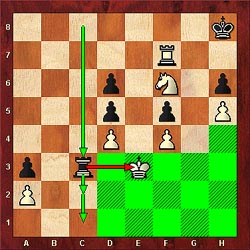
On rare instances, the stalemate can be a saving grace when the losing side establishes a "super-Queen" or "super-Rook." This occurs when the losing side has only one piece they can move… either a Queen or a Rook. If the winning side is careless, then the losing side will begin to set off an endless string of checks. The key is that if the winning side ever captures the last piece, it would be a stalemate draw!
In Diagram #6, white has just moved the Knight from e8-square to the f6-square threatening checkmate in one move with the Rook on the h7-square. While this is normally the right idea, this move allows black to draw with an endless string of checks on the 1st, 2nd and 3rd ranks. White cannot escape. If the King tries to run to any of the green squares, black will continue checking and even sacrifice the rook to create a stalemate!! This theme has happened at all levels of play. Amazing!
|
|
|
|
|
|
|
|
|
|
|
|
|
|
|
|
|
|
|
|
|
|
|
|
|